Showing posts with label pork. Show all posts

Sunday, June 3, 2012

Sausage


Sausage

We use a lot of it here, I make all of it. This started when my wife gave me a copy of Ruhlman and Polcyn: Charcuterie shortly after it was published. The two have a second book Salumi due out in late August.

Bruce Aidells, the Marianskis have books, Home Sausage Making, Mastering the Craft of Making Sausage, The Whole Beast and Professional Charcuterie are others.

Not to mention the CIA Garde Manger and the Professional Charcuterie series, different than Professional Charcuterie above (for when you win the lottery as it is $200+ a volume).
Charcuterie is not limited to sausage, and includes fermented sausage, which I’m not going to get into here. What will be here is an over view of the process, books (see above), supplies and equipment sources, see below, and tips I’ve picked up or discovered in the years I’ve been doing this.

Note: There will be recipes in the future, including those of the three I posted today, this is more of a how to and about.


There are grill sausage, which will be the first I post about, there are breakfast sausages and there are more general sausages for dinner, a charcuter plate or a mixed grill.

Tips:

First, while you want everything as cold as possible, do not put the grinder in the freezer, regardless of what the books say. Put it in an ice bath. Blades chip, which means discarding the entire grind (I also have a spare blade).

Second, if you do more than one grind at a time, don’t wash the grinder parts, rinse them in cold water. It is already clean, what is on it is clean food waste, rinse it off. Do not put the waste down the disposal, put it in the garbage. This is stuff the grinder couldn’t grind, why do you think the disposal will. It won’t like casing either, believe me I know.

Steel the blade of your grinder before each single use.


When you do grind, grind into a steel bowl set in an ice bath. If the room is in the low 60s so much the better.

If the recipe calls for a portion of ice cold water, use ice chips instead, the grinder won’t mind and it keeps it colder.

The meat grinder attachment on a stand mixer will work, but I do a lot of sausage, 20 pounds at a time is common. I use a commercial grinder from Northern Tool (see below). I also use a five pound stuffer from them.


I buy pork shoulders, remove the skin, debone and then pack in 5 pound put ups. I also use turkey thighs and chicken thighs both mixed with about 10% pork fat, veal is usually too dear, but some beef is used mixed with rendered suet for the fat. 5 pounds is my typical grind and I find that a shoulder is fatty enough. Obviously if you are doing a mix of pork and another meat, you want to use a smaller put up. The put ups then get frozen for several weeks, the skin and bones get turned into stock (the link is to chicken stock, but pork is the same, just use pork not chicken, this is a light or white stock basic recipe)

Freezing the pork for more than 3 weeks at below 0 F, removes the problem of undercooked pork harboring trichinosis, although with only 12 cases in the US for the last year reported this is a minor problem now. Trichinosis, see the paragraph on freezing.

Supplies:
Northern Tool is probably your best bet for tools and food processing equipment such as a grinder or stuffer.

Take you put up out of the freezer and put it in the fridge for a couple of days to defrost.
Cut the meat into small pieces, I aim for ¾ of an inch on a side and not more than an inch long.


You want them small enough to slide down the feed tube without pushing them. Put the bowl containing you now diced put-up in a freezer for 30+ minutes. I simply move on to the next put up, but I do3 or 4 sausages at a time.

Or you can use the time for your mise in place. Liquids in the fridge until used.


Get your meat out of the freezer, put in a larger bowl, add the mise in place and mix. I use my hands, but you could use a spoon.


Now assemble your grinder direct from the ice bath and grind.


You may wish to use a mixer to insure a good mixture at this point, if using a fermenting agent this is vital, literally.

Back in the fridge until the next step, stuffing the sausage. Note, many sausages may be used out of the casing, if so save yourself time and money, by putting the sausage up without casing. I use ½ pound put ups of finished sausage, one is a lunch for two and three two dinners for two.

For five pounds of sausage you need one length, about 10 feet, of a medium hog casing; 32-35 mm.

yes I know that is a larger size, it was in stock.


Natural casing will keep indefinitely in a refrigerator when packed in salt. Cover in salt each time you take out the hank of casings.
Soak it in cool water and wash the inside, by filling with water and letting the bubble run through the length two or three times. It will remove the salt and make it much easier to get on the stuffing tube.


Slide the whole length on to the appropriate (there will probably be 3) size of stuffing tube.


The sausage waiting for the stuffer.
Bratwurst in the corner, Sweet Italian at the edge and Knockwurst in the center.


And twisted into links. I use the width of my left hand to size the length and alternate the twist from clock wise to counter clockwise, which saves twisting the whole 10 foot length.


The whole table is designed to take a wood clamp around the entire edge, which keeps the stuffer from moving. This also works on the mixer to keep it from walking.

And lunch, fresh knockwurst just off the grill

Sausage will keep for a couple of months in a zip lock, but label carefully, they all look alike frozen. If you use a Food Saver they will keep longer, but that is more work and money, what is your turn over here?

Camera Nikon D-90 with internal flash.

Lens(es) AF-S NIKKOR 18-55mm f2.5-5.65G
                AF-S NIKKOR 70-300mm f4.5-5.6G
                AF-S NIKKOR 35mm F1.8G
                AF-S NIKKOR 50mm F1.4F
                AF DC-NIKKOR 105 mm F2

Recipe with pictures Downloadable PDF  Link doesn’t work 

on the PDF itself

Recipe without pictures Downloadable PDF Link doesn't work

 on the PDF itself

As always feel free to use and distribute, if you use our pictures 

and/or text then give us credit – thanks.

If you do use the recipe drop us a note in the comments, a link to your post or just what you thought.

© 2012 Virginia L. Dyson & Warner W. Johnston  

Monday, March 19, 2012

Maple Cured, Hickory Smoked Bacon

Maple cured, pasture raised, hickory smoked bacon.


You are going to need the book by Ruhlman and Polcyn.


5 pound pork belly (either certified trichinosis free or freeze it for the appropriate time at the appropriate temperature, tables at USDA but 3 weeks below 0F is a good rule of thumb)
1/4 cup Basic Dry Cure (see Charcuterie)
1/2 cup maple syrup


Above are two pork bellies, trimmed to fit into large zip lock bags, in this case trim weight is just under 5 pounds each.


Place the belly in a zip lock with the cure rubbed over the meat and the syrup poured in. It is not necessary to trim off the skin, although you can.

Refrigerate  the belly, in the ziplock, for about 7 days, checking to see when the thickest part is firm. Flip the bag, which must be flat, every day and do not drain the liquid which will form.


When the belly is firm, take out of the bag, rinse and let dry (an extra day or two in the fridge, if it is raining won't hurt).  Note that this drying is critical to the smoke 'sticking'. It should look a bit like a second skin and is called a pellicle (with thanks to Amy Sipes for reminding me of this). Allow to return to close to room temperature, while you fire your smoker. 


I get the smoker to about 250 F, and use hickory. Smoke until the internal temperature at the thickest part is above 150 F.

Alternately roast in a medium oven, 325 F, until internal temperature at the thickest part is above 150F. You could use liquid smoke, but I've never done so. The roast is much better than commercial bacons, I don't like it as much as the smoked, but if is raining you might have no choice.


When bacon has cooled, cut into useful sized pieces and freeze. I find that 1 pound in FoodSaver bags frozen at 0F lasts about 1 year. I do not remove the skin until use, and I do fry it, even though it has been cooked through.

I still use commercial bacon for some things, such as this pate, where I don't want the smoke and need uniform thin pieces, but use is very minimal.

The pork belly came from Dietrich's . You really want to buy from a butcher that is proud of her meat. 

Fleisher's probably has or can get it.


"If bacon were declared a vegetable, I could become a vegetarian" Matthew Scudder

Camera Nikon D-90 with internal flash.

Lens(es) AF-S NIKKOR 18-55mm f2.5-5.65G
                AF-S NIKKOR 70-300mm f4.5-5.6G
                AF-S NIKKOR 35mm F1.8G
                AF-S NIKKOR 50mm F1.4F
                AF DC-NIKKOR 105 mm F2

Recipe with pictures Downloadable PDF  Link doesn’t work 

on the PDF itself

Recipe without pictures Downloadable PDF Link doesn't work

 on the PDF itself

As always feel free to use and distribute, if you use our pictures 

and/or text then give us credit – thanks.

If you do use the recipe drop us a note in the comments, a link to your post or just what you thought.

© 2012 Virginia L. Dyson & Warner W. Johnston  


Monday, March 5, 2012

Pork Marengo

More pictures will be added in the future.


Pork Marengo

2 ½ lbs pork shoulder in stew chunks
2 c onions
1         tbsp garlic
1 28 oz can diced tomatoes, drained
1 c white wine
4 carrots
2 1/2c pork/veal/chicken stock
Zest of one large orange


Salt and pepper the pork.  Brown in large sauté pan.  Add the onions and wilt  them. Add the garlic.
Deglaze with the white wine. Add the stock the tomatoes and the carrots.
Simmer on low heat for two hours.

Can be made a day in advance.


No links at this time:


Camera Nikon D-90 with internal flash.

Lens(es) AF-S NIKKOR 18-55mm f2.5-5.65G
                AF-S NIKKOR 70-300mm f4.5-5.6G
                AF-S NIKKOR 35mm F1.8G
                AF-S NIKKOR 50mm F1.4F
                AF DC-NIKKOR 105 mm F2

Recipe with pictures Downloadable PDF  Link doesn’t work 

on the PDF itself

Recipe without pictures Downloadable PDF Link doesn't work

 on the PDF itself

As always feel free to use and distribute, if you use our pictures 

and/or text then give us credit – thanks.

If you do use the recipe drop us a note in the comments, a link to your post or just what you thought.

© 2012 Virginia L. Dyson & Warner W. Johnston  

Saturday, February 11, 2012

Sausage, Sauerkraut and Potato Gratin


Sausage, Sauerkraut and Potato Gratin 

There are not many pictures as this started as a let us use the grill sausage in the freezer before it goes bad. The next time we do it we will add lots more pictures. It turned out a lot better than expected and has moved in status from lunch to dinner. 

2 cups pork stock
5 small Yukon gold potatoes
2 lb sauerkraut - drained
½ lb. Bratwurst
1 lb. Knockwurst
  [note or equal weight in sausage that goes well with sauerkraut]
Vegetable oil
Arrowroot
Dijon
Sage
Thyme
Salt
Pepper
350 F oven

Dice 3/8-1/2 inch the potatoes and sauté in the oil. Salt and pepper to taste, add 1 cup pork stock and simmer until almost done.

Cut up and sauté sausage in second pan. 1” to 1 ½ pieces

Layer sauerkraut in medium gratin pan, then layer potatoes and then layer sausage.

Heat the remaining stock and add sage, thyme and Dijon. Reduce slightly as preferred. Add arrowroot to thicken, pour over gratin.

Bake at 350 F – 45 minutes


Note: there will be more pictures 

Camera Nikon D-90 with internal flash.

Lens(es) AF-S NIKKOR 18-55mm f2.5-5.65G
              AF-S NIKKOR 70-300mm f4.5-5.6G
              AF-S NIKKOR 35mm F1.8G
             AF-S NIKKOR 50mm F1.4F

Recipe with pictures Downloadable PDF  Link doesn’t work 

on the PDF itself

Recipe without pictures Downloadable PDF Link Doesn't work

 on the PDF itself

As always feel free to use and distribute, if you use our pictures 

and/or text then give us credit – thanks.

If you do use the recipe drop us a note in the comments, a link to your post or just what you thought.

© 2012 Virginia L. Dyson & Warner W. Johnston  


Monday, January 9, 2012

Pate Stuffed Pork Chops

2 double thick pork chops
1 bag, 16 oz. blue Pepperage Farm stuffing
1 medium+ onion, medium fine dice
1 stick of butter
2-3 cups stock - chicken is fine, pork if you have it
salt 
pepper
4 oz slice of Country Pate

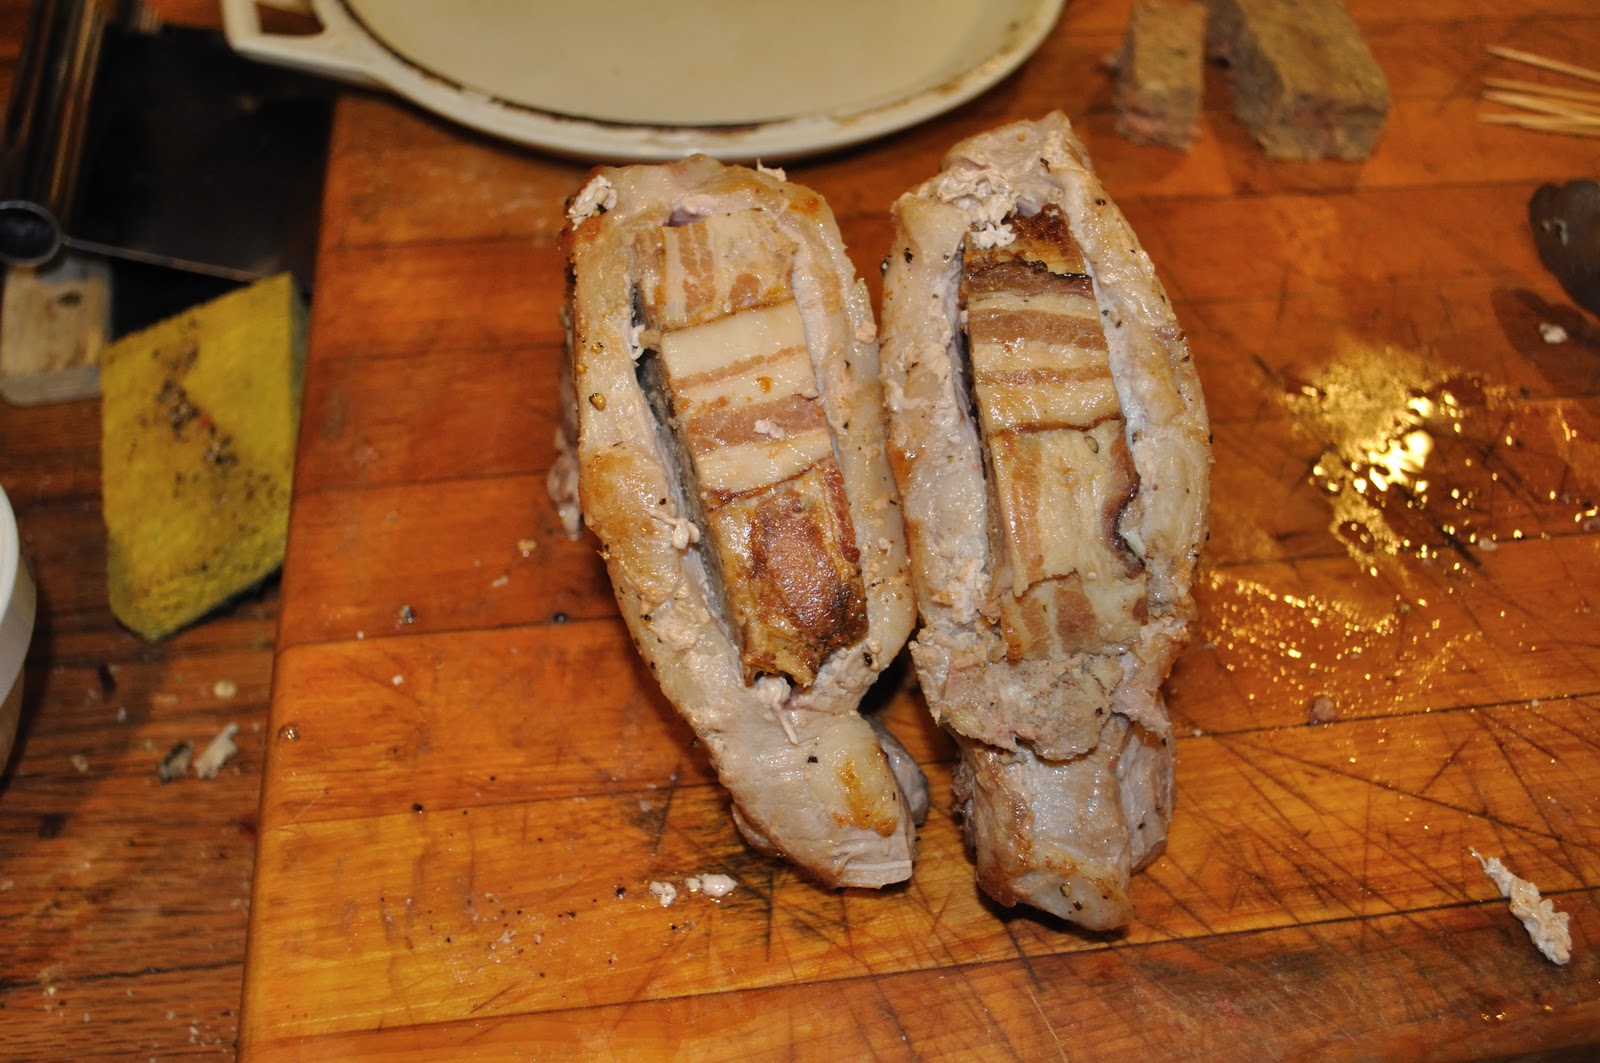
Take two double thick pork chops, you may notice these have a bit more fat than most, they are from a Amish raised pig.


Cut a pocket in each one, deep and tall, this is where the pate will go.


Put some of the butter in the bottom of a largish casserole and heat.


Brown the chops


On both sides


And the edge


Melt the rest of the butter and saute the onion in it, removing the fond from the bottom of the pan in the process. Mix in the dry stuffing and 2 1/2 cups of the stock, you will want the rest to add later if the stuffing becomes too dry.

The stuffing shown here is actually also made with a pound of home made Andouille sausage.


Get the stuffing flat


Cut the pate in two smaller pieces


And stuff the pork chops, note the chops will be hot. As a variation you could use some of the stuffing to stuff the pork chops, but we have this pate in the freezer. You can use wood toothpicks to hold the chop closed, but if you do use the same number of wood toothpicks on both chops and tell the other person how many to look for.


Put onto the bed of stuffing.


Put in 325 F oven for not quite 2 hours, you will want the chop to reach about 155 F USDA guidelines are 145 F.


If it isn't quite time for dinner, turn oven way down, or simply off.
Finished dish below.


Served with a Noble Pig Pinot Noir 2008


Camera Nikon D-90 with internal flash.

Lens(es) AF-S NIKKOR 18-55mm f2.5-5.65G
              AF-S NIKKOR 70-300mm f4.5-5.6G
              AF-S NIKKOR 35mm F1.8G
             AF-S NIKKOR 50mm F1.4F

Recipe with pictures Downloadable PDF  Link doesn’t work 

on the PDF itself

Recipe without pictures Downloadable PDF Link Doesn't work

 on the PDF itself

As always feel free to use and distribute, if you use our pictures 

and/or text then give us credit – thanks.

If you do use the recipe drop us a note in the comments, a link to your post or just what you thought.

© 2012 Virginia L. Dyson & Warner W. Johnston