Sunday, June 10, 2012

Pulled Pork [well chopped at least]

Pulled Pork

The rub

1/2 teaspoon mild paprika
1/2 teaspoon firmly packed dark brown sugar (or raw sugar)
1/4 teaspoon hot paprika
1/8 teaspoon celery salt
1/8 teaspoon garlic salt
1/8 teaspoon onion powder
1/8 teaspoon freshly ground black pepper
1/8 teaspoon dry mustard powder
pinch salt

Above ingredients per pound of pork shoulder

8 pound skinless pork shoulder, bone in (can be larger it will just take longer)

Mix the rub together, rub over pork, put in a plastic bag and let it sit overnight in the fridge.


Get the shoulder out about three hours before it goes in the smoker to bring the temperature up.

There are about two hours of final prep and standing and the pork will take about 1 hour per pound to cook in the smoker. So for an 8 PM meal, put the shoulder in a low temperature, 225F, smoker at about 10 AM. Bring the pork up to 195 internal temperature, Note it can be hurried in an oven at 400 if needed or held in a 195 oven for some time. If you do the high oven after 8 hours or so in the smoker, check the internal temperature often, you don't want it above 195.


The sauce

1/4 cup cider vinegar
3 oz water
1 oz ketchup
1 oz packed dark sugar
3/4 teaspoon salt
1/4 teaspoon hot red pepper flakes (can double if you like heat)
1/4 teaspoon freshly ground black pepper
1/4 teaspoon freshly ground white pepper

All ingredients per pound of pork shoulder

Mix above together

When pork has reached 195 F, take off heat and let it sit under aluminum foil tent for 15-30 minutes (20 minutes for an 8 pound shoulder). Pull into pieces, discarding skin, fat and bone. Chopping with a cleaver is acceptable and done in some good BBQ joints.  Transfer to non-reactive cooking vessel, mix in half the sauce, cover with the foil and put back in smoker for up to 45 minutes.

Serve over good sandwich rolls, white or whole wheat as you prefer.


Serve with a Pilsner or I'm told Killian's Red works well, will let you know. Pilsner was excellent: Pilsner Urquell and the lager Czechvar

Camera Nikon D-90 with internal flash.

Lens(es) AF-S NIKKOR 18-55mm f2.5-5.65G
                AF-S NIKKOR 70-300mm f4.5-5.6G
                AF-S NIKKOR 35mm F1.8G
                AF-S NIKKOR 50mm F1.4F
                AF DC-NIKKOR 105 mm F2

Recipe with pictures Downloadable PDF  Link doesn’t work 

on the PDF itself

Recipe without pictures Downloadable PDF Link doesn't work

 on the PDF itself

As always feel free to use and distribute, if you use our pictures 

and/or text then give us credit – thanks.

If you do use the recipe drop us a note in the comments, a link to your post or just what you thought.

© 2012 Virginia L. Dyson & Warner W. Johnston  


Sunday, June 3, 2012

Sausage


Sausage

We use a lot of it here, I make all of it. This started when my wife gave me a copy of Ruhlman and Polcyn: Charcuterie shortly after it was published. The two have a second book Salumi due out in late August.

Bruce Aidells, the Marianskis have books, Home Sausage Making, Mastering the Craft of Making Sausage, The Whole Beast and Professional Charcuterie are others.

Not to mention the CIA Garde Manger and the Professional Charcuterie series, different than Professional Charcuterie above (for when you win the lottery as it is $200+ a volume).
Charcuterie is not limited to sausage, and includes fermented sausage, which I’m not going to get into here. What will be here is an over view of the process, books (see above), supplies and equipment sources, see below, and tips I’ve picked up or discovered in the years I’ve been doing this.

Note: There will be recipes in the future, including those of the three I posted today, this is more of a how to and about.


There are grill sausage, which will be the first I post about, there are breakfast sausages and there are more general sausages for dinner, a charcuter plate or a mixed grill.

Tips:

First, while you want everything as cold as possible, do not put the grinder in the freezer, regardless of what the books say. Put it in an ice bath. Blades chip, which means discarding the entire grind (I also have a spare blade).

Second, if you do more than one grind at a time, don’t wash the grinder parts, rinse them in cold water. It is already clean, what is on it is clean food waste, rinse it off. Do not put the waste down the disposal, put it in the garbage. This is stuff the grinder couldn’t grind, why do you think the disposal will. It won’t like casing either, believe me I know.

Steel the blade of your grinder before each single use.


When you do grind, grind into a steel bowl set in an ice bath. If the room is in the low 60s so much the better.

If the recipe calls for a portion of ice cold water, use ice chips instead, the grinder won’t mind and it keeps it colder.

The meat grinder attachment on a stand mixer will work, but I do a lot of sausage, 20 pounds at a time is common. I use a commercial grinder from Northern Tool (see below). I also use a five pound stuffer from them.


I buy pork shoulders, remove the skin, debone and then pack in 5 pound put ups. I also use turkey thighs and chicken thighs both mixed with about 10% pork fat, veal is usually too dear, but some beef is used mixed with rendered suet for the fat. 5 pounds is my typical grind and I find that a shoulder is fatty enough. Obviously if you are doing a mix of pork and another meat, you want to use a smaller put up. The put ups then get frozen for several weeks, the skin and bones get turned into stock (the link is to chicken stock, but pork is the same, just use pork not chicken, this is a light or white stock basic recipe)

Freezing the pork for more than 3 weeks at below 0 F, removes the problem of undercooked pork harboring trichinosis, although with only 12 cases in the US for the last year reported this is a minor problem now. Trichinosis, see the paragraph on freezing.

Supplies:
Northern Tool is probably your best bet for tools and food processing equipment such as a grinder or stuffer.

Take you put up out of the freezer and put it in the fridge for a couple of days to defrost.
Cut the meat into small pieces, I aim for ¾ of an inch on a side and not more than an inch long.


You want them small enough to slide down the feed tube without pushing them. Put the bowl containing you now diced put-up in a freezer for 30+ minutes. I simply move on to the next put up, but I do3 or 4 sausages at a time.

Or you can use the time for your mise in place. Liquids in the fridge until used.


Get your meat out of the freezer, put in a larger bowl, add the mise in place and mix. I use my hands, but you could use a spoon.


Now assemble your grinder direct from the ice bath and grind.


You may wish to use a mixer to insure a good mixture at this point, if using a fermenting agent this is vital, literally.

Back in the fridge until the next step, stuffing the sausage. Note, many sausages may be used out of the casing, if so save yourself time and money, by putting the sausage up without casing. I use ½ pound put ups of finished sausage, one is a lunch for two and three two dinners for two.

For five pounds of sausage you need one length, about 10 feet, of a medium hog casing; 32-35 mm.

yes I know that is a larger size, it was in stock.


Natural casing will keep indefinitely in a refrigerator when packed in salt. Cover in salt each time you take out the hank of casings.
Soak it in cool water and wash the inside, by filling with water and letting the bubble run through the length two or three times. It will remove the salt and make it much easier to get on the stuffing tube.


Slide the whole length on to the appropriate (there will probably be 3) size of stuffing tube.


The sausage waiting for the stuffer.
Bratwurst in the corner, Sweet Italian at the edge and Knockwurst in the center.


And twisted into links. I use the width of my left hand to size the length and alternate the twist from clock wise to counter clockwise, which saves twisting the whole 10 foot length.


The whole table is designed to take a wood clamp around the entire edge, which keeps the stuffer from moving. This also works on the mixer to keep it from walking.

And lunch, fresh knockwurst just off the grill

Sausage will keep for a couple of months in a zip lock, but label carefully, they all look alike frozen. If you use a Food Saver they will keep longer, but that is more work and money, what is your turn over here?

Camera Nikon D-90 with internal flash.

Lens(es) AF-S NIKKOR 18-55mm f2.5-5.65G
                AF-S NIKKOR 70-300mm f4.5-5.6G
                AF-S NIKKOR 35mm F1.8G
                AF-S NIKKOR 50mm F1.4F
                AF DC-NIKKOR 105 mm F2

Recipe with pictures Downloadable PDF  Link doesn’t work 

on the PDF itself

Recipe without pictures Downloadable PDF Link doesn't work

 on the PDF itself

As always feel free to use and distribute, if you use our pictures 

and/or text then give us credit – thanks.

If you do use the recipe drop us a note in the comments, a link to your post or just what you thought.

© 2012 Virginia L. Dyson & Warner W. Johnston  

Saturday, June 2, 2012

Sauerbraten

The original purpose of this was to make a very tough piece of meat edible, it would have been used on a cow or work cattle. It also works for venison, although you may wish to adjust the spicing.

Now it is about flavor, as beef is a lot more tender.

3 pounds of beef roast (may be a tough cut)

2 cups red wine (one you would drink)
2 cups dark beef broth (home made preferred and is important)
3 tablespoons red wine vinegar
3 tablespoons brown sugar (dark preferred but not important)
1/4 cup tomato paste (any in the fridge?)
2 cloves garlic, fine mince
1 teaspoon salt
1/2 teaspoon fresh coarse ground pepper
1 teaspoon ground clove
pinch ground ginger
2 onions thin sliced
8-10 crushed gingersnaps
2 teaspoons dry mustard
1 teaspoon Worcestershire


 Mix everything except beef as a marinade.


Put in beef and refrigerate until beef tender 2-5 days. 


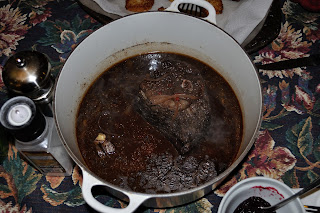
Cook beef in marinade over low flame in heavy covered pot until tender.  

Cook beef in marinade over low flame in heavy covered pot until tender. 


 Serve with cranberry sauce, potato pancakes and red cabbage. (Recipes for all three will follow, although the cranberry sauce won't have pictures for a while). (3-17-12)


Camera Nikon D-90 with internal flash.

Lens(es) AF-S NIKKOR 18-55mm f2.5-5.65G
                AF-S NIKKOR 70-300mm f4.5-5.6G
                AF-S NIKKOR 35mm F1.8G
                AF-S NIKKOR 50mm F1.4F
                AF DC-NIKKOR 105 mm F2

Recipe with pictures Downloadable PDF  Link doesn’t work 

on the PDF itself

Recipe without pictures Downloadable PDF Link doesn't work

 on the PDF itself

As always feel free to use and distribute, if you use our pictures 

and/or text then give us credit – thanks.

If you do use the recipe drop us a note in the comments, a link to your post or just what you thought.

© 2012 Virginia L. Dyson & Warner W. Johnston